Introduction to the mol Module
For the course of this tutorial, we assume that you have DNG up and running.
Loading and inspecting a protein structure
The code to load and save structures is not directly part of the mol module, but rather lives in a module dedicated to input and output of any kind of data: The
io module. We will be using functions of this module to load
structures.
One of the most commonly used file formats for macromolecular structures are PDB (Brookhaven Protein Data Bank) files. The official name for molecules stored in a PDB file is an entity and we decided to follow this convention in OpenStructure. You will hear this word all the time, but you can replace the word entity with molecule (or most of the time even protein) in your head.
Loading a PDB file leaves you with an EntityHandle. This is
the central class holding together chains,
residues and
atoms in a straight-forward hierarchy. This
hierarchy will always be intact: there are no atoms without a residue they
belong to and no residues without chains which have to belong to an entity.
Beside the molecule itself, there are a lot of additional attributes stored in
the entity, like the
centre of mass.
To load a PDB file, simply type
fragment = io.LoadPDB('/path/to/examples/code_fragments/entity/fragment.pdb')
This will load the fragment from the specified file ‘fragment.pdb’ and store the
result in fragment. The LoadPDB() has many options, which, for
simplicity will not be discussed here. If you want to know more about the
function, type:
help(io.LoadPDB)
or read the online documentation.
The loaded structure is an instance of EntityHandle which offers a comprehensive interface to inspect an manipulate molecular structures. Now let’s inspect what we just loaded:
print(len(fragment.chains), fragment.chains)
print(len(fragment.residues), fragment.residues)
print(len(fragment.atoms), fragment.atoms)
As you can see, our fragment consists of one peptide chain of 12 amino acids and has 81 atoms in total. Now let’s examine our fragment in more detail. Enter the command
for residue in fragment.residues:
  print(residue, 'has', len(residue.atoms), 'atom(s).')
  for atom in residue.atoms:
    print(' ', atom.name, atom.pos)
This will group the atoms by residue. And, for completeness, we will first group them by chain, then by residues.
for chain in fragment.chains:
  print('chain', chain.name, 'has', len(chain.residues), 'residue(s)')
  for residue in chain.residues:
    print(' ', residue, 'has', len(residue.atoms), 'atom(s).')
    for atom in residue.atoms:
      print('    ', atom.name, atom.pos)
A protein fragment would not be complete without bonds. Let’s see what bonds we have in there:
for bond in fragment.bonds:
  print(bond)
Let There Be Shiny Graphics
For visually inspecting the fragment, we now create a graphical representation
of the entity. The graphical representation is completely separate from the EntityHandle class. This is on purpose. When writing processing scripts, usually no graphical representation is required and things would be slowed down without any reason. The following code will take our fragment and initialise a gfx.Entity, add it to the scene, and center the camera on it.
go = gfx.Entity("Fragment", fragment)
scene.Add(go)
scene.CenterOn(go)
Now you will see the fragment in the 3D window.
Use the mouse to rotate, zoom in and shift the camera. Double clicking on an
atom will center the camera on that atom. If you want to learn more about the
gfx module, you are encouraged to read the gfx
intro and the gfx documentation.
Introduction to Views
Often during processing and visualisation of data, only parts of a protein
structure are of interest. This realisation has had a major impact on the
design of OpenStructure and is tied very deeply into the core of the framework.
Subparts of structure are modelled as so-called EntityViews. You can think of them as a selection of chains,
residues, atoms and bonds of an entity stored in a variable. A view has almost
the same interface as the underlying entity, making it very easy to mix entity
views with handles in Python due to the dynamic nature of the language. An
algorithm that is written for entities will almost always (with some care) also
work for
EntityHandles. This is referred to as
duck-typing (I don’t care if it
isn’t a duck as long as it looks like a duck), a concept used all over the place
in Python. For views, the same rule as for
entities applies: No atom can be part of the
view without it’s residue.
To familiarize yourself with the concept of views, we will use the fragment in the 3D window of the last example.
- We will use several ways to select parts of our fragment:
By using a dedicated query language
By manually constructing a view
The Query Language
The first way to select parts of a structure is with a dedicated mini-language, called the query language. In the Python shell, type
go.selection = fragment.Select('')
The code performs a selection on the fragment and assigns the resulting view to the selection of the graphical object. A green halo will be displayed around the selected parts (image in the middle).
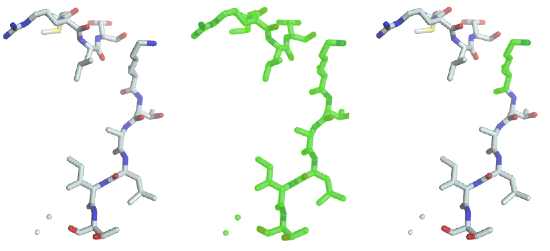
As you can see the previous statement created a “full view”, containing all the chains, residues, atoms and bonds. To select lysine residues, type
go.selection = fragment.Select('rname=LYS')
As you can see (image on the right), the only lysine residue is now highlighted in the 3D window, because it was the only one matching the predicate “residue name must be equal to LYS”. Several such predicates can be combined with boolean operators such as and and or. To select residues with residue number 1 to 3, the following statement will do the job:
go.selection = fragment.Select('rnum>=1 and rnum<=3')
but this is very cumbersome. That’s why there is a shortcut to this statement. You can specify a range of values.
go.selection=fragment.Select('rnum=1:3')
For a complete description of what you can do with the query language, have a look at the Queries.
Constructing Views Manually
Sometimes the query language is not enough. For these cases the construction of manual entities becomes necessary. This is pretty straight forward:
view = fragment.CreateEmptyView()
ca = fragment.FindAtom('A', mol.ResNum(1), 'CA')
cb = fragment.FindAtom('A', mol.ResNum(1), 'CB')
view.AddAtom(ca)
view.AddAtom(cb)
go.SetSelection(view)
The last step sets our constructed view as the current selection, displaying it in the 3D window. As you can see, C-alpha and C-beta of the first residue are not connected by bonds, even though both atoms are in the view. You have either to add the bond manually with
ca_cb = ca.FindBondToAtom(cb)
view.AddBond(ca_cb)
Or, as a very convenient shortcut
view.AddAllInclusiveBonds() to
add all bonds that have both bonding partners in the view.
Don’t forget to update the selection of the graphics object to see what view you have created.
go.SetSelection(view)
Saving an Entity
Saving an entity (or a view) is a breeze:
io.SavePDB(fragment, 'full.pdb')
will save the full fragment. To save only the backbone atoms, we can first select the backbone atoms and then save it:
io.SavePDB(fragment.Select('aname=CA,C,N,O'), 'backbone.pdb')
That’s it for the mol module. Continue with part two of the tutorial.